This section describes advanced tasks performed by the editor.
In the editor's application two work modes are possible:
Simple mode
Advanced mode
By default the simple mode is enabled. In order to switch to the advanced mode select the option from the menu. In ordert to get back to the simple mode select again the option from the menu.
The differences between the modes (views) are presented on the Table 3.1, “Differences between editor's application work modes”.
Table 3.1. Differences between editor's application work modes
| Feature \ Mode | Simple mode | Advanced mode |
|---|---|---|
| Publication node |
| Afrter opening a publication all its editions are visible. Files versions which compose particular edition are visible after opening the edition. On the elements list there is also a publication files element which contains all files connected with the publication. |
In order to further edit an existing publication, its files must be downloaded into editor's local machine.
To download an edition of a publication:
On the elements list select the edition to be downloaded (it can be the current edition as well).
From the context menu select the function. Alternatively, the toolbar
 button or
main menu options can be used.
button or
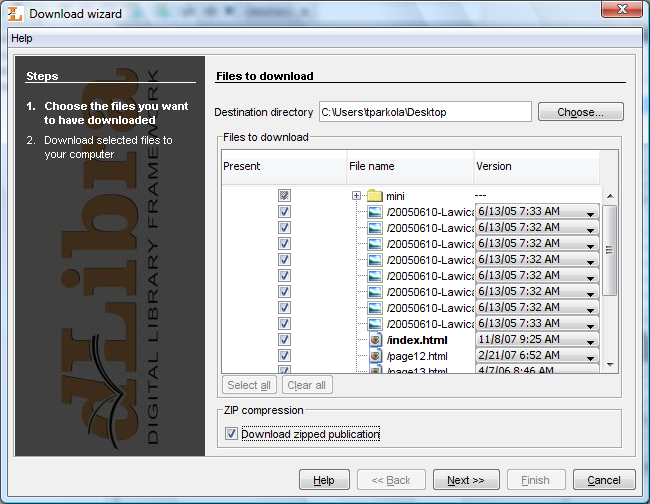
main menu options can be used.In the first step ( Figure 3.30, “Download Wizard - publication file selection page”) select the local disk directory the publication files shall be stored in.
In the Files to download table the default file selection can be altered. To exclude a file from the download list --- uncheck the appropriate position in the Present column. Additionally, the version to be downloaded can be changed using a pull down list in the Version column.
It is possible to download the publication as the zip archive. In order to do this check Download zipped publication check box.
Press the button to proceed to the file download page.
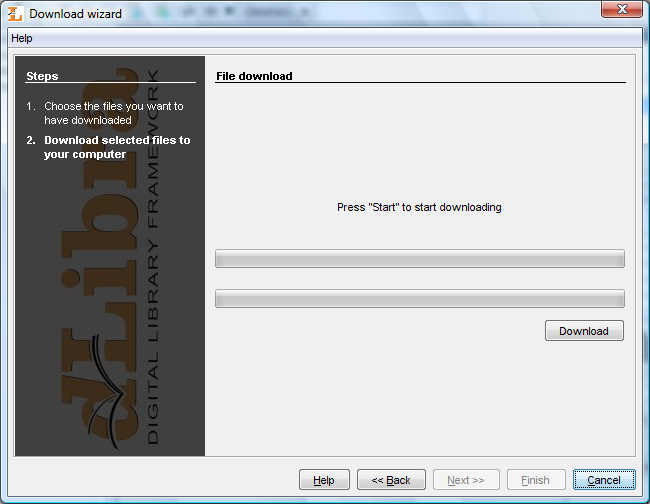
In the second step ( Figure 3.31, “Download wizard - file download page”) press the button to start downloading the selected publication files to the selected local disk directory. The process can be paused and resumed pressing the button again.
After the downloading process finishes press the button to close the wizard.
If the author of already published publication will modify/update its content then it is needed to update this publication in the dLibra system (modified files have to be sent to the server). After the update operation it is possible to make those changes available for web users (new edition can be created based on newly added filed).
To send the new files to the server:
Switch the application to the advanced mode then on the elements list open the publication to which the new files versions shall be assigned and select Publication files element.
From the context menu select the function.
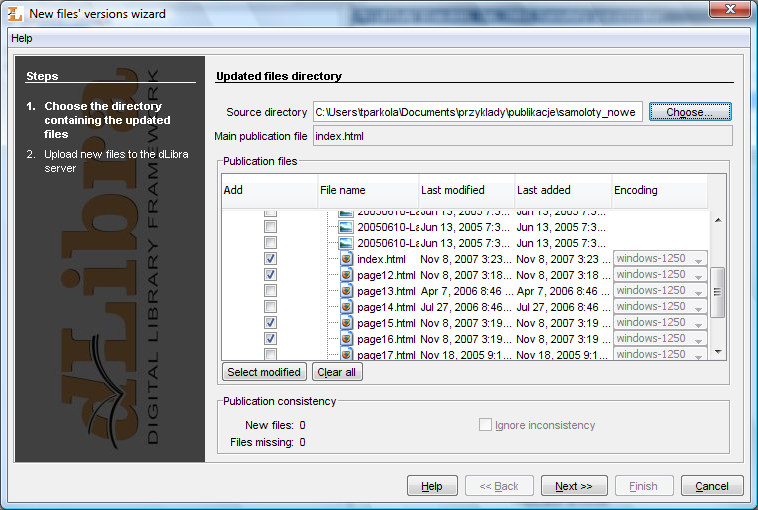
In the Add new files' versions wizard select the local disk directory that contains the updated publication files.
Selected directory has to contain publication main file. Missing files are marked by
 .
.The wizard selects files to update based on the modification and storage dates. By default, files modified after the last store/add operation are selected. The selection can be altered by checking/unchecking appropriate positions in the Add column of the publication files table.
Press the button to proceed to the file upload page.
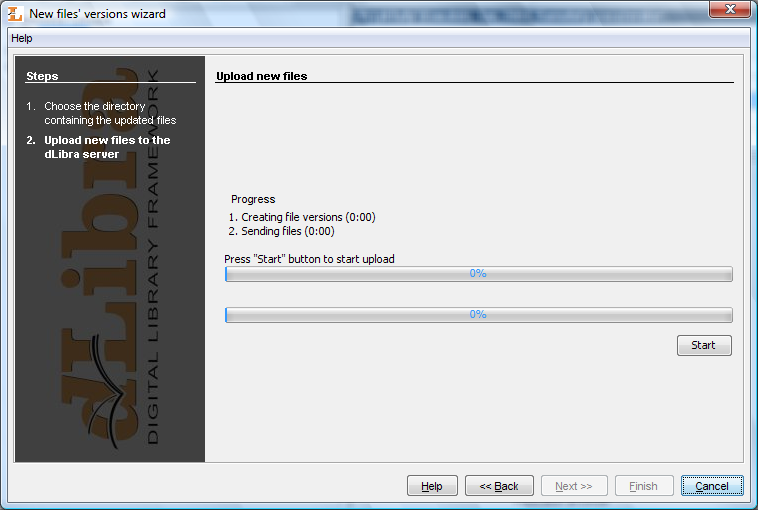
Press the button to start uploading selected publication files to the server. The process can be paused and resumed by pressing the button again.
After the uploading process finishes press the button to close the wizard.
Edition is a viewable form of a publication - to make a publication available for viewing an edition must be created and published.
To create an edition of a publication:
On the elements list select the edition (e.g. the current edition) the new edition should be based on.
From the context menu select the function. Alternatively, the toolbar
 button or main
menu options can be used.
button or main
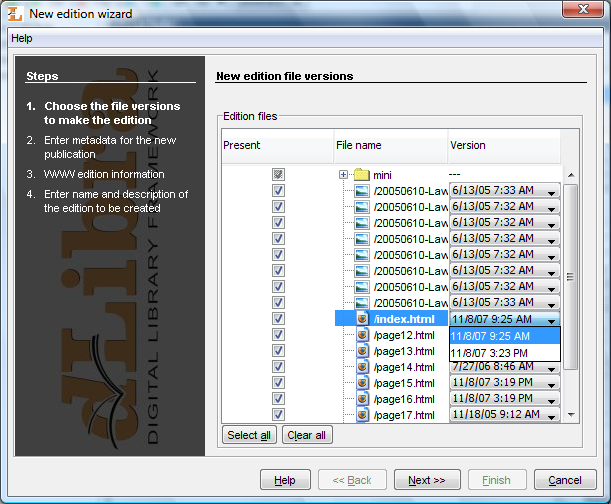
menu options can be used.In the New Edition Wizard select the versions of publication files to compose the new edition.
When the new edition is based on a branch of a publication, the newest versions of files lying on the branch are selected. When the new edition is based on an existing edition of a publication the selected file versions are the same as in the base edition.
The selection of file versions can be altered using a drop down list embedded in the Version column of the Edition files table.
To proceed to the edition properties page press the button.
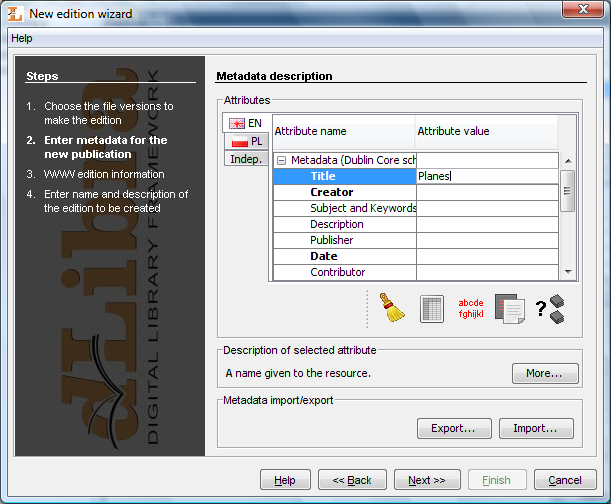
In this step enter bibliographic description for new edition. It is possible to import bibliographic description from MARC 21 lub RDF format.
To proceed to the next step press button.
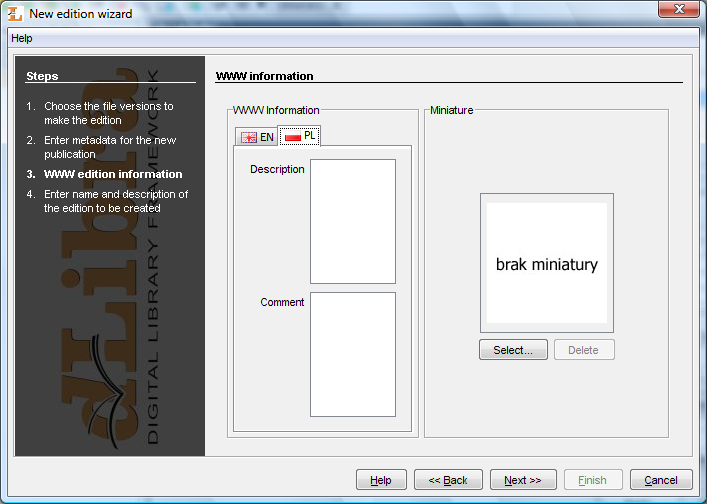
Enter WWW information: Description which is presented on search results list, Comment available on edition information page and miniature presented on edition information page.
To proceed to the next step press button.
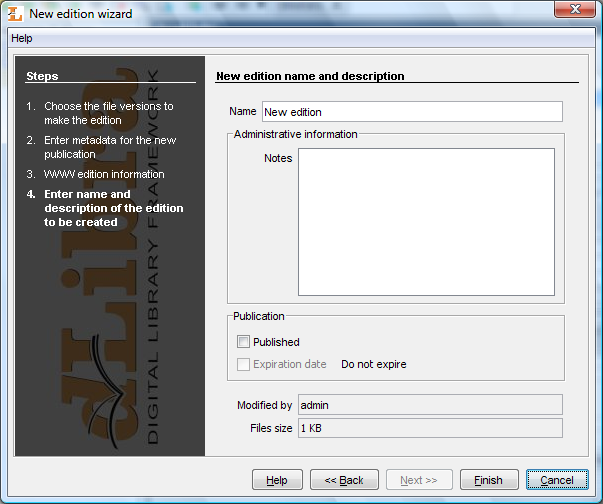
Enter the new edition's name and description in the Name and Description fields. To make the new edition published check the Published option. This can also be done after the edition is created.
To create the new edition press the button.
In order to remove edition two condition have to be fulfilled:
Edition is not the only one edition of publication
Edition is not published
Remove edition choosing  option from context menu.
There are three mechanisms which allow publication files management. The first one is file version removal. File version can be removed when it is not the only one version of a file and it is does not belong to any edition. The second mechanism is file removal. File can be removed when none of its versions belongs to any edition. The third mechanism is automatic deletion of redundant files. Redundant files of publication are files and files versions which may be removed. In order to delete redundant files choose option from context menu of Publication files element (it is available after publication is opened, only in advanced mode).
In this section it is described mass publication upload mechanism.
To start mass publication upload creator select from menu.
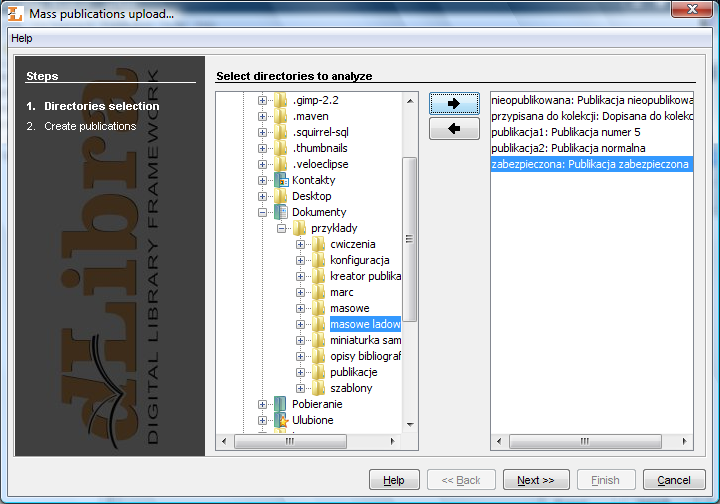
In the first step ( Figure 3.38, “Mass publication upload creator - publications selection.”) we specify publications which will be sent to dLibra server.
First step's window is splitted into two parts: on the left side there is a system directories tree, on the right side there is a list of publication to upload. In order to add publication to upload:
On the system directories tree check a directory containing subdirectories describing publications (information about the structure of a directory describing a publication are placed in the next section).
Press the
 button. Application will check corectness of directories
describing publications. In case of errors, appropriate
messages will be shown.
After adding publications to send it is possible to go to the next step.
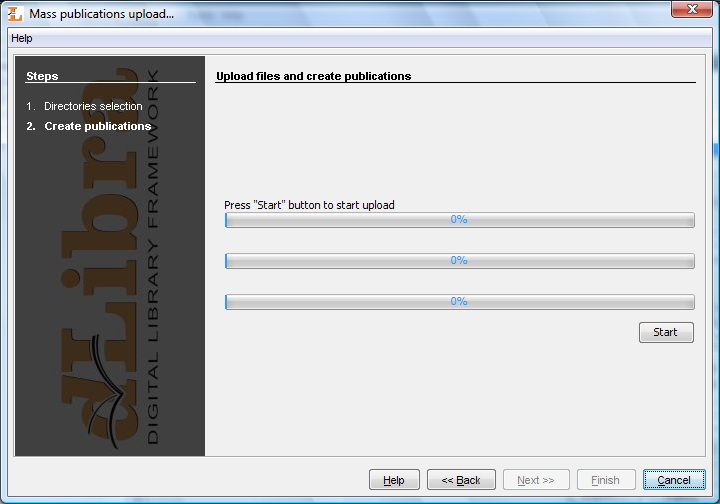
In the second step we send publication to the server.
Figure 3.39, “Mass publication upload creator - publications upload” shows a window of the second step. To send publications press button. During the upload process is it is possible to monitor the progress throught to the progress bars. When the process finished appropriate summary is shown. If for any reason uploading of one or more publications failed, it is possible to check error messages by pressing the button.
Directory describing a publication consists of:
publication.properties file which describes publication,
Optional RDF file which contains bibliographic description fo the publication,
Publication files.
publication.properties file is publication properties file. It consists of attribute—value pairs. Attribute is separated from value by the equals sign (=). Every pair is placed in separate line.
Possible attributes and their values are presented below.
Attribute publication.actorsRights.<user login or group name to which we will assign rights>
Rights separated with a comma. The list of possible rights:
pv – publication view
pr – publication read
pe – publication management (edit)
Attribute publication.collections
Collections identifiers separated by a comma to which publication is be assigned to.
Attribute publication.destination.directoryId
Destination directory identifier.
Attribute publication.destination.parentPublicationId
Destination group publication identifier.
Attribute publication.mainFile
The name of the publication main file (including extension). Specified file has to be in directory describing this publication.
Attribute publication.metadataFile
Metadata filename (including extension). Metadata file has to be accordant with RDF format and it has to be placed in directory describing a publication. By default metadata filename is the same as publication main file name except the extension—it is .rdf.
Attribute publication.name
Publication name.
Attribute publication.notes
Administrative notes concerning publication.
Attribute publication.published
Attribute indicating whether the firs edition of this publication should be published or not. If the value is true edition will be published. In any other case the edition will not be published. Default value is false.
Attribute publication.secured
Attribute indicating whether the publication should be secured or not. If the value is true publication will be secured. In any other case it will not be secured. Default value is false.
Attribute edition.image.content
The name of the file which contains edition's miniature.
Examplary publication.properties file:
publication.actorsRights.publicGroup=pv,pr
publication.collections=2,7,12
publication.destination.directoryId=1
publication.mainFile=index.htm
publication.metadataFile=metadata.rdf
publication.name=Przykładowa publikacja
publication.notes=Stworzone przez Jana Kowalskiego
publication.published=true
Above examplary file specifies a publication. publicGroup will have right to view (pv) and read (pr) it. Publication will be assigned to collections indicated by identifier 2, 7 and 12. Publication will be placed in the directory indicated by identifier 1. Publication main file will be index.htm and metadata are in metadata.rdf file. Publication name is “Examplary publication” and administrative notes are “Created by John Smith”. First edition of this publication will be published and publication itself will not be secured.
To create publication it is required a minimal set of informations described below. It it is impossible to gain all these informations it is impossible to creata a publication.
Publication destination in Directories Tree. There are two ways to specify it: destination directory (publication.destination.directoryId attribute) and destination group publication (publication.destination.parentPublicationId attribute) or destination directory only.
Publication main file. It is specified by publication.mainFile attribute and it is required.
Publication name. There are two ways to specify publication name. First way is to specify publication.name attribute. If this attribute is not specified metadata file will be checked in order to compose publication name in the same way as in fourth step of new publication creator (it is composed of title, author and date). So metadata file is the second way.
Inheritance mechanism was introduced in order to simplify assigning some attributes from publication.properties file.
Inheritance mechanism works in the following way: For every publication.properties file, which is to be read (let us name it a “child”), it is checked if there exists a publication.properties file in the upper directory (let us name it a “parent”). If the “parent” file exists its content is read, then the content of “child” is read. During the reading process there is a rule that says that attribute values are overridden. It means that if both “parent” file and “child” file specify the same attribute, the “child”'s attribute value is taken (“parent” attribute value is overridden).
Notice that this mechanism works recorsivelly. It means that before the “parent” file is read, it is checked if there exists its “parent” (if yes, it is read).
This mechanism works in the same way as for publication.properties files with one exception—“parent” file should have publication.rdf name.
So, if we will specify in publication.properties file attribute publication.metadataFile, it will be checked if there exists its “parent” (publication.rdf).
Menu item in menu makes it possible to save information describing selected on the elements list publication (such a file can be used as an example for mass publication upload).
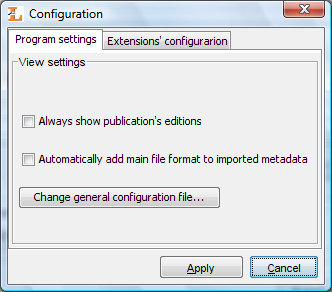
After choosing the option from the menu configuration window will appear ( Figure 3.40, “Application's configuration window”).
Tabs placed in configuration window allow user to configure particular application features. In the following sections all the tabs are described.
Program settings tab enables user to adjust editor program view. This configuration is connected with editor program modes. If Always show publication's editions option is not checked then editor application works in simple mode, otherwise it works in advanced mode. Switching mode in editor application this option is switched in fact. The meaning of the option is described in Table 3.1, “Differences between editor's application work modes”.
Next configuration option is connected with check box. If this check box is selected then after metadata import process imported metadata are automatically enriched with edition main file format value. If this check box is not selected then imported metadata are not enriched.
Remaining configuration parameters may be retrieved from configuration file. In order to change configuration file select button and point on file or URL to configuration file. Please remember to select check box. The configuration file contains advanced configuration options. It is a properties file where keys and values are separated by equals character. The following parameters are in the configuration file:
gui.lookandfeel - indicates name of the Java programming language class which is responsible for the way that GUI elements are displayed. If there is no value present then default GUI is used (basis on the OS).
tags.refresh.period - the value indicates time in miliseconds between the update processes (retrieval of information from server) of tags list. Default value is 600000 which is 10 minutes.
tags.message.period - the value indicates time in miliseconds between displaying messages that there are tags to moderate. Default value is 1800000 which is 30 minutes.
newPublication.title.template - the value defines a template used to create title of an element (e.g. publication) which is being created. The template is a velocity template. In the template especially named variables are replaced with values from attributes. Those variable should have a name identical with RDF name of an attribute. Default value is $!{Creator}#if ( ($Date || $Title) && $Creator ), #end$!Date#if ( $Title && $Date ), #end$!Title. For example in place of $Creator variable value of an attribute which has Creator RDF name will be placed.
searchDuplicates.roles.url - the value is a URL where the list of Dublin Core roles can be found. Attributes which have these roles should be used in duplicates search mechanism. Default value is http://fbc.pionier.net.pl/owoc/ajax.xml?id=GetDCRolesForDups.
searchDuplicates.results.url - the value is the first part of a URL which will be used to perform duplicates search process. The second part state search parameters. Default value is http://fbc.pionier.net.pl/owoc/ajax.xml?id=GetDups.
sortTokens - the value is a list of strings separated by | character. These strings are removed from the beggining of elements names when sorting elements on directories tree or elements list. Default value is "|(|[...]|[|the |the.
Examplary configuration file could have the following parameters (if there is no specific configuration key then its default value is used):
tags.refresh.period=60000
tags.message.period=3600000
sortTokens=[|]|/
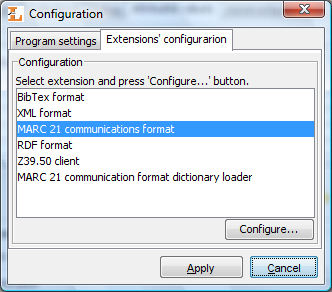
Extensions' configuration tab allows user to specify extensions' configuration. List of configurable extensions is placed on this tab ( Figure 3.41, “Configuration - Extensions' configuration tab”). In order to change setting of specific configuration select extension from the list and press button. By default, the following extensions are available:
MARC 21 communication format (configuration details can be found here).
XML format (default configuration allows to import metadata from RDF and MASTER format, configuration details can be found here).
Bibtex format (configuration details can be found here).
RDF format (configuration details can be found here).
Z39.50 extension (metadata retrieval, configuration details can be found here).
Dictionary loader from MARC files (details can be found here).
